Tuesday, January 31, 2023

School Days Layout with Storybook

Good morning!

This kit is available at any workshop day.  I am including detailed instructions on this post, in case you would like to recreate the page from your own stash.  At the bottom of blog, there is a list of needed supplies.


Steps:

Trim your base cardstock (2) so you are left with a 1" frame.  I have used Mist in my example.

Trim your white cardstock 1/2" on one side, rotate 90 degrees and trim 1/4".  Your end product will be 2 sheets of 11 1/2" x 11 3/4". 

Place the white sheets on the cut base sheets.  The white paper is flush in the center, leaving an even border around the edges.  Using a corner rounder, clip the far corners on the left page and the far corners on the right page, but leave the center corners square.

Cut (4) 1/4" x 11 3/4" strips from a stripe pattern.

Cut an 11" circle.  I used the Cricut.  You can trick the machine into cutting an 11" circle by telling it you have inserted a 24" mat.  Cut the circle by placing the edge on the 8" mark of your trimmer. 

Cut the center pieces of your base pages to 6 3/8" tall.  Trim one of the remaining scraps to 3 1/4" x 8 1/2". From the other leftover piece, stamp the bib-li-o-phile stamp several times in Versamark, and clear emboss.  Using an alphabet die set, cut out some letters.  Wrap several with string.

From a 3rd piece of matching cardstock, cut a 6" x 8 1/2" mat.

Draw a light pencil line 3" from the top on each of the white pages.  Stamp the row of books (I used Sage) starting at the right side on both papers.  Stamp 3 times on the left page and 4 times on the right page.

Stamp the open book, the stack of books and the certified tab on white card stock in the same-colored ink (Sage in the example). Then stamp on top of the image with Versamark and clear emboss.  

On a 4"x6" piece of white card stock, cut using the notebook die on each long edge.  Slide the die from edge to edge, do not turn it around.   (Just try to cut it straighter than I did in the video.)


Adhere everything down, sprinkle in a few wooden letters, and add a few dots with liquid pearl (black in the example).  You could also use old alphabet stickers to make your ABC clusters, if that works better for you.  There is sufficient space on the left page, top or bottom, to stamp an appropriate title - just use different font to keep with the mix and match ABC theme!

Supply list:

  • 3 sheets Mist cardstock
  • 2 1/2 sheets white cardstock
  • 1 sheet printed paper (I used papers from Storybook)
  • 1"x12"striped paper (cut into 1/4"strips - or you can use glitter trim here)
  • String, yarn or twine
  • Versamark
  • Clear embossing powder
  • heat embosser
  • Sage ink
  • In a Book stamp set and dies
  • True to Life stamp set (retired)
  • Black liquid pearl
  • Notebook edge die (retired)
  • Adhesives & blocks


Tuesday, January 24, 2023

Something new...

 If you haven't already subscribed, the Close to My Heart Blog Site has great tips and information about the latest products.  Like the Valentine's special paper pack Now & Forever.


Or - if you are a bunny fan, it's the year of the Rabbit, complete with a super cute bunny stamp by CTMH.   Also available in 2023 is the 2022 year of the Tiger stamp.

Thanks for hopping by!


Tuesday, January 17, 2023

Are We There Yet? Scrapbook Workshop

 With the help of Casey Blake and Christine Robertson, we are offering the following scrapbook workshop. It's an 8-page workshop using the Are We There Yet? papers. The cost is $30.


If you don't need the full set of 4 double layouts, we will be breaking up two of the sets for sale by layout, at $10 each.

Tuesday, January 10, 2023

Cherish Card Workshop

Hello!

 If you missed out on purchasing this card workshop last year, now is your chance to make some with my tools.


Make these 4 cards for $5 on any workshop Thursday, while supplies last.  

(P.S. What looks like a woman's face on the bottom right card is just light reflecting off the clear covers I have on the cards.)

Tuesday, December 20, 2022

Merry Christmas!

 I wish you the very best, with a week full of family, friends and love.

But today you can drag out your shiny new 2023 calendars - I have scheduled the dates for my events in 2023!  Yep - all year!

I'm trying something new this year.   Any feedback for improvement is appreciated. 

Workshop day is Thursday, January 26 from 10am until 10pm. Come during the day or after work, whatever time is best for you. I will be offering workshops as I create them, but you can create any available workshop on any Workshop Thursday, buffet style. Make one or make them all, but only the pages or cards you find useful.

Saturday, January 28th will be the first all day crop at my house in 2023, from 10am until 10 pm, with lunch provided, for $5 or free with any order of $10 or more.  This part is the same as always.  However - you can also use this day as a makeup day for any workshop that is still available.   So, it's Crop/Workshop Saturday.

This combination of days will happen just once a month.  If we start having lots of participation, I could add an additional day.

2023 dates:

  • January 26 & 28
  • February 23 & 25
  • March 23 & 25
  • April 27 & 29
  • May 25 & 27
  • June 22 & 24
  • July 27 & 29
  • August 24 & 26
  • September 28 & 30
  • October 26 & 28
  • November 16 & 18
  • December 7 & 9  (Yep!  Added something in December, can you believe it?)

I have these workshops available, with at least one more in the works before the 26th.  Stay tuned!  Clicking on the title will send you to the blog page where you can see the details about the workshops.

I hope you have a wonderful Christmas.  Thank you for scrapping with me!

Thursday, September 15, 2022

Crisp Air Card Set

 I LOVE the Crisp Air graphics, even the Picture My Life cards.  I've used them to create a set of 12 cards.  It uses everything except one 3X4 journaling card and a few scraps.


I'll be holding a class to make these cards at 2:00 - 8:00 pm on September 29. This class is not as labor intensive as my last one; it should only take about 2-3 hours.  The extended length of the workshop is so you can drop by in the afternoon or after work.  You can also purchase a precut kit for completion in your own space on your own time (and your own adhesive).  


If you are interested in the purchasing just the instruction set, please leave your request in the comments or contact me.  You will need to purchase the following:

  • Crisp Air PML cards
  • Crisp Air embellishment dots
  • Gold gems
  • Gold glitter paper
  • White, Sapphire, Pine, Scarlet and Expresso cardstock
  • Twine
  • Sending Love and Laughter stamp set
  • Udderly Wonderful stamp set & dies (die no longer available)
  • Clear shimmer brush
  • Swirl background die
  • Scarlett, Expresso and Sapphire inks
  • Markers to color with
  • Foam tape
  • Card bases and envelopes


Crisp Air Card Workshop (choose one)

Sunday, September 4, 2022

Hawthorn Triple

 Hello!

Way back yonder, I made kits with the Hawthorn paper packs, and I had a decent amount of scraps leftover.  I constructed these 3 layouts from them.  There's nothing very difficult about the layouts.  I've included a few notes in case you would like to recreate them with your own papers.

The world is from Artisty, page 30, 10 3/4 top layer, 10 1/2 bottom layer.  Set it for real dial size.

The hexagon papers are the base pages in this one.

Used the new travel stencil pack for the EXPLORE and fussy cut it. The photos build from the bottom up, ladder style, stopping at the little strips in the middle of the page.  The brown square at the bottom is simply a fill strip, incase my pictures don't quite fit.  You can add another picture in the top left,or use it for a different title or journaling. 


Sunday, August 28, 2022

Toadally Awesome Shaker Card

 Hello!

Sometimes getting an idea from the brain onto paper doesn't translate as well as you would like.  But my Toadally Awesome shaker card still didn't turn out too bad.


The paper is from Backyard Bliss.  Both it and the frog stamp set are currently available.
I stamped, colored and cut out the frog, then cut it again using the wide stitch circle for shakers. I also cut another stitched circle from white cardstock.  I then glued the frog to the blue background (an older mix-in paper) and the edges to the white circle, lining them up first.
The next steps are:
  • Glue the clear shaker circle to the back of the white circle.
  • Line up and adhere the colored circle to your stamped outline.
  • Place the foam circle around the colored frog, leaving the top layer of paper on.
  • Fill with a few sequins or gems, then pull off the paper to reveal the sticky foam.
  • Add the clear top window.

I used these colors for the frog. 


Thursday, August 18, 2022

National Stamping Month Card Class

 Good morning!

September is National Stamping Month and CTMH has some great sets for the occasion.  It is a large offering, available September 1 through October 31.  The full package is $150 or you can buy just what you like (available online beginning September 1).


I am offering two workshops, one on Saturday, August 27 from 10am-1pm and another on Thursday, September 1st from 2-5pm for you to create 12 cards (6 designs, 2 of each).  Choose whichever time works best for you.


If you register and pay for a class in advance, you will be entered into a drawing to win one of the background dies used in the class.  


Register via PayPal here!  Choose a workshop with or without envelopes included.


NSM Workshop

Sunday, August 14, 2022

#OptOutside

 Hello!

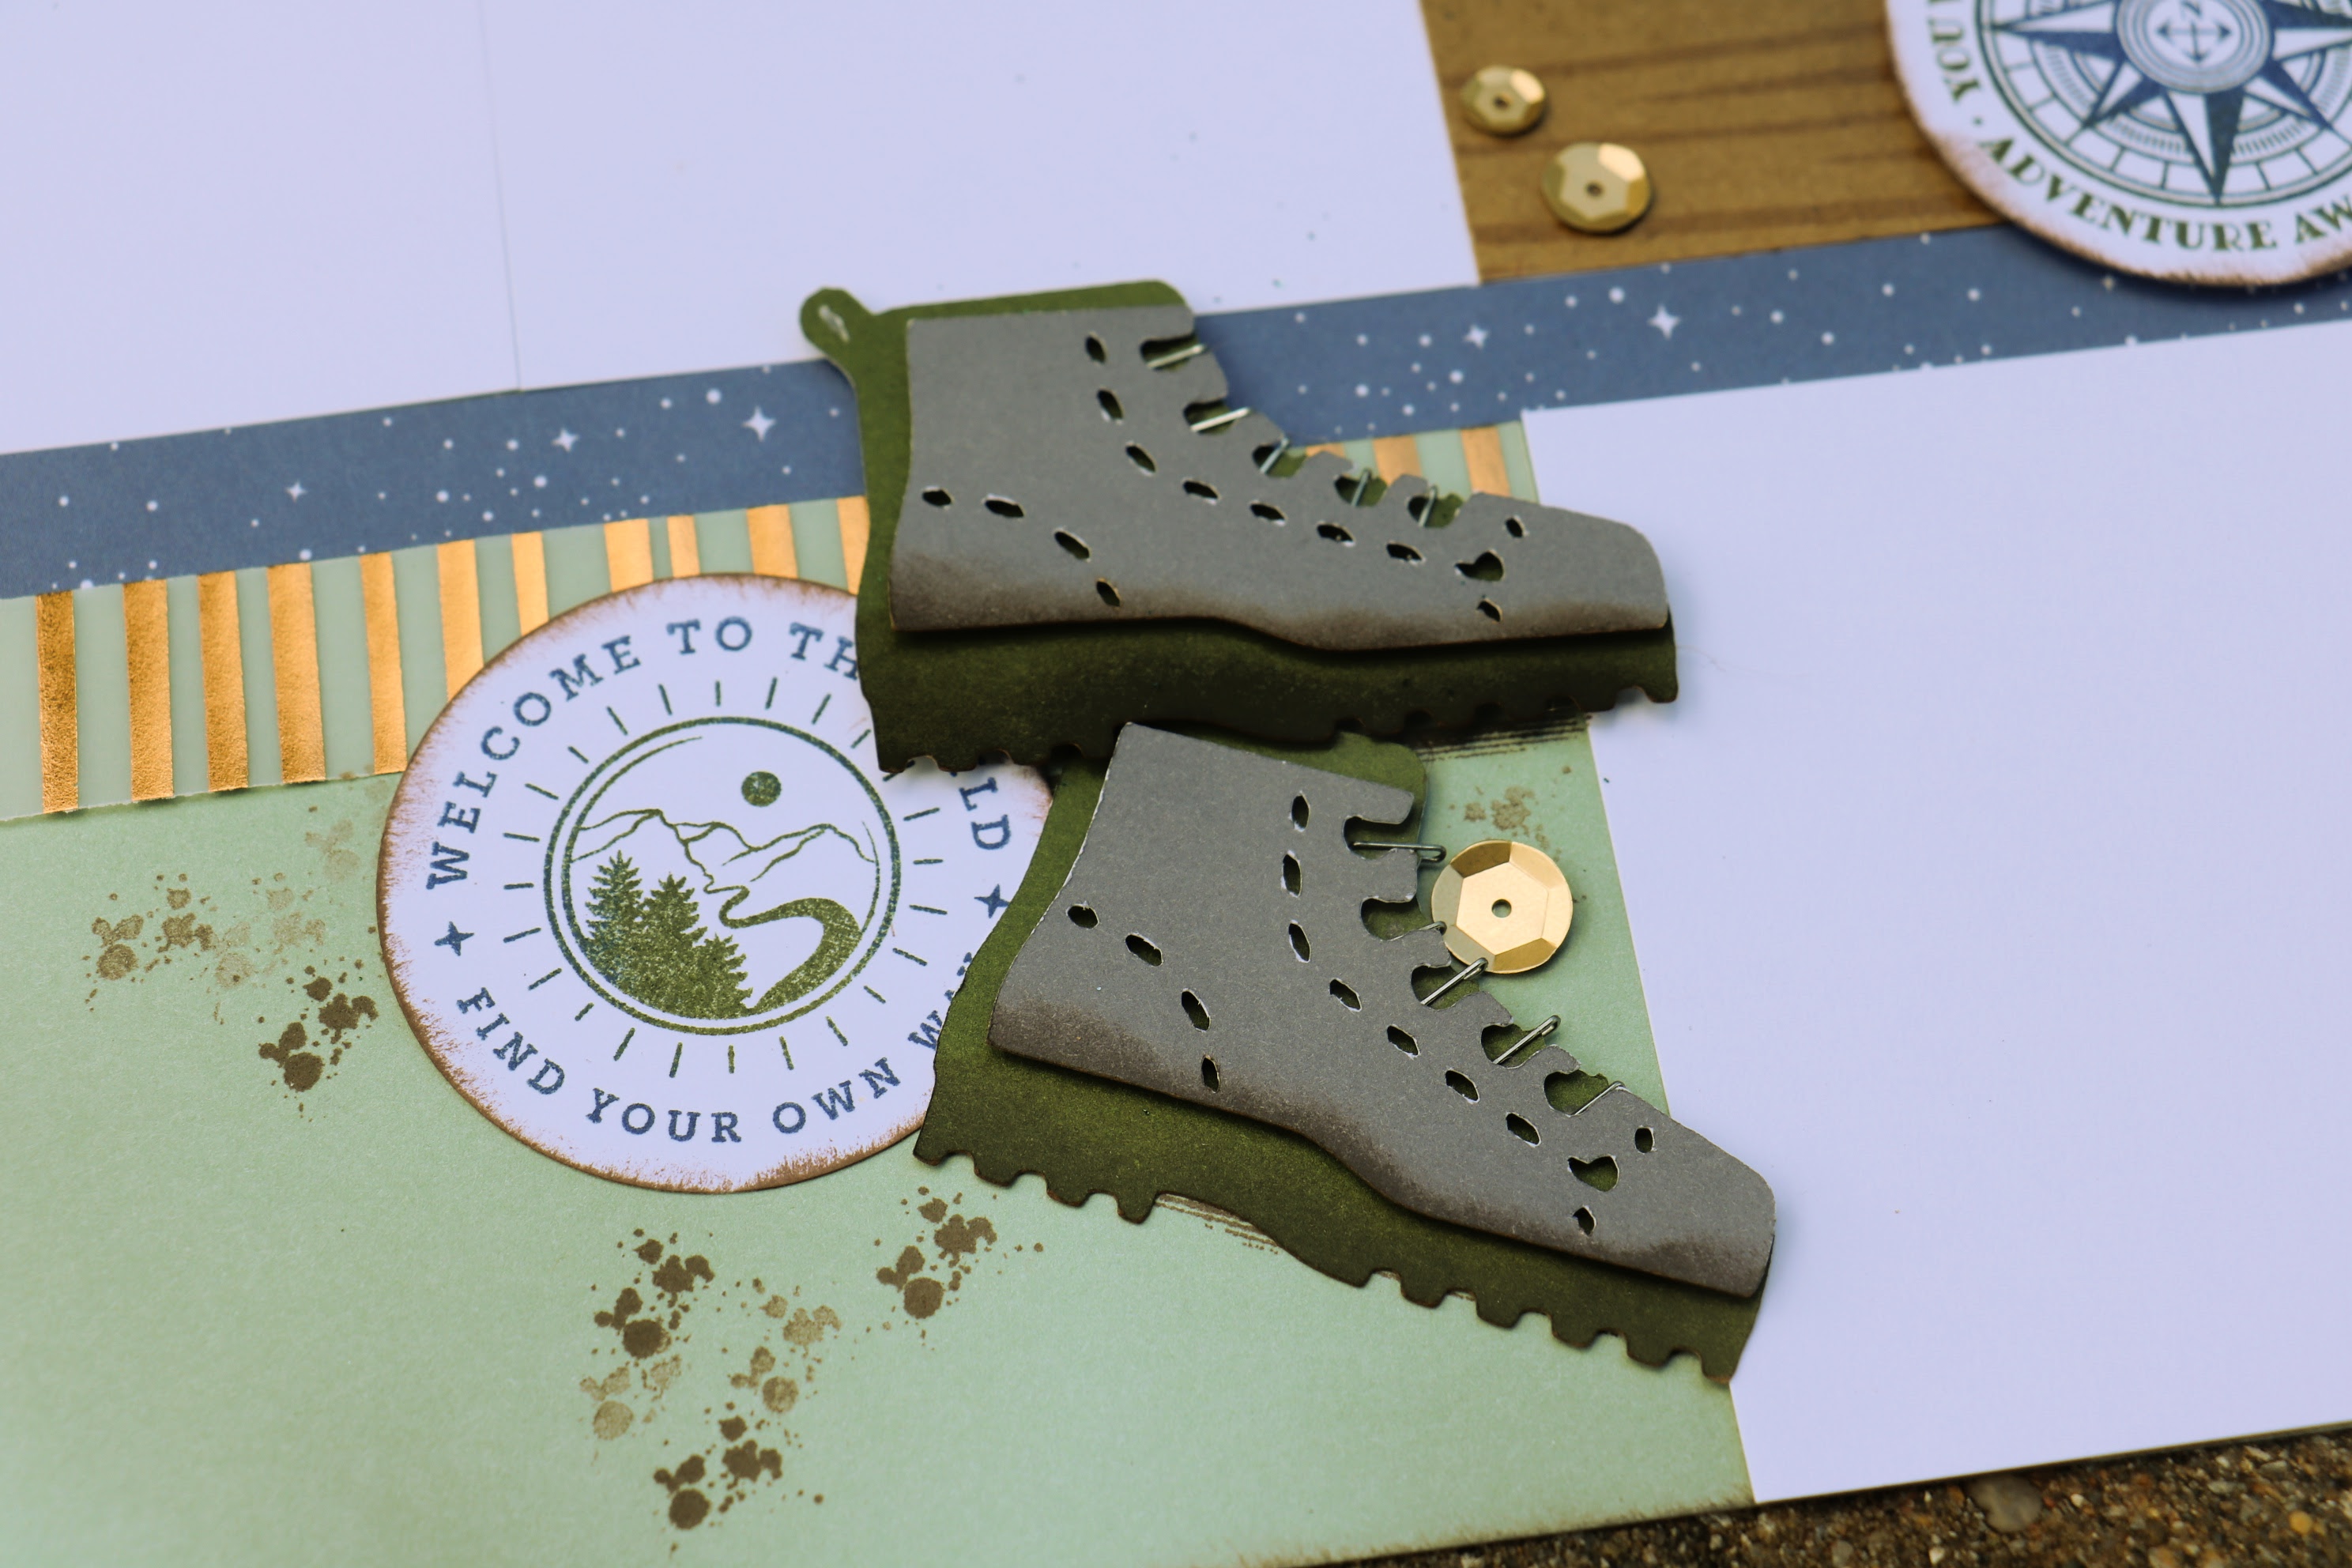
I've been working through some of my really old stash, incorporating them into kits.  The kraft wood grain paper and the bronze foil velum in this kit are very old.  The camping paper is from Wander Pack (2021).  I have the precut kit available for $10, or I've included some cutting tips below, so you can use your own really old stash too!


  • bronze foil stripes - 3/4" wide, 8" long (2) and 6" long (2)
  • blue stars - 1/2" x 12" (4) 
  • wide print - 4" wide, 12" long (1) and 6" long (1)
  • woodgrain kraft - 4"X6" and 3"X4"
  • #OptOutside 3/4"; bottom layer charcoal light side, top layer green glitter paper
    • You are Here cartridge, page 25
  • Boots 1 3/4", cut 2; bottom layer New England Ivy dark side, top layer charcoal light side
    • You are Here cartridge, page 35
  • banners
    • green glitter, 3/4 " x 1 1/2" 
    • yellow stripe, 1/2" x 2"
    • woodgrain kraft, 1/2" x 2 1/4" 
  • white paper - 3 1/2" x 5 1/2" and 2" circles (3)
  • Adventure Badges stamp set (B1803, July-September 2022 catalog)
  • Strokes of an Artist (D1887, retired) for the mud tracks (any small splatter will do)
  • Expresso ink for stamping and edging
I used the mini staple gun to give the shoes laces. I tried to make a hemp string work but couldn't come up with a simple method I was happy with.  If you do, please show me what you did!


I also used gold sequins on my page, but they are no longer available, even in my kits.  Chances are you still have a few in your stash, a package of the loose gold sequins or something else you can make work. 


Double coloring this particular stamp set was very easy.  


Sunday, August 7, 2022

Bowling Fun

 Hi and howdy.

My most recent creation is this bowling layout.


I have the kit available for sale ($5), with the word FUN instead of BABES.  (I do have BABES available if it applies to your bowling photos.)  This layout does not use a lot of paper and is flexible for up to 9 photos.  All the pictures I had were horizontal, so the layout above worked for my photos.  You can drop the placement of the bottom strips, and use 6 vertical photos, plus one at the top.  My favorite photo positions for this layout use 9 pictures, like this layout from 2008.


It's 4 verticals and 4 trimmed horizontals, plus the round one at the top, which I really like.  It all depends on your photographs, but the layout is quite versatile.  


If you would like to make the kit from your own supplies, see below for more details.

Base pages - French Vanilla

Strips - (2) 1" Candid moments paper

        (2) 1/4" Candid moments paper

        (2) 1/4" Carolina cardstock 

Bowling pins - 4" white/sapphire, You are Here cartridge, page 44

Bowling bowl - 2" sundance/carolina, stamped in sapphire/sundance, You are Here cartridge, page 44

Strike up some Fun stamp set in sapphire, sundance and carolina.

Good Times was colored with Golden Yellow from the old Shin Han marker set.

Title is cut from sapphire.  Bowling- Harrington font 1.5" high

        FUN - Basic Cut 3" high.

Bitty sparkles


If you are using vertical photos, start the bottom strip at 1 1/2" from the bottom.  If all your photos are horizontal like mine, start at 2 3/4".  Or add even more photos and start where ever you like!

Friday, October 30, 2020

Birthday flamingo

 It's Halloween!  So of course, I'm off course and making birthday cards with the Rewards Your Way stamp set.  


Thursday, October 8, 2020

Pool Party

 This is an older Bells & Whistles layout workshop, for which I never posted the completed layout.  The kit was sitting in someone's stash (you know who you are!) and they needed a picture to finish putting it together, so I'm adding it here!


I still have 2 of these kits left, if you just love this paper and icons, but it's a pretty easy layout to duplicate on your own.  And it holds a nice amount of pictures!

Sunday, September 27, 2020

Skulls in a Jar

 A Boo to You!

I saw this idea a long time ago on Pinterest.  I went back to look for the card, to give credit to the original creator, but I couldn't locate it again.  

You can put anything in a jar!  Use sticky notes to create some masks and away you go.


I am entering this in the H2H Challenge - Wood you rather?  CTMH has a great new set of wood papers - I just haven't ordered any yet.  The wood grain table on this card is from an older paper pack.  


Saturday, August 29, 2020

August H2H Challenge

Hello!
Today I'm playing with gold embossing powder and the new Desert Rose paper.  It's been inspired by the H2H August Photo Challenge.  It's a good place for inspiration, or to show off your own creations.


And I made a recipe card with the other side of the torn strip.


The stamp sets I used are retired, but the concept can be applied using something in your stash.


Thanks for dropping in!
Dawn