
This is a direct copy from CTMH's blog. Check out what else they talk about here - CTMH Blog site. This one was so great I wanted to make sure you saw it!
A Thing or Two About Re-inkers
When creativity strikes, you can be sure to find a full spectrum of color-coordinated products within any Close To My Heart catalog, including our most often unsung hero—the re-inker.
Available in every exclusive color, these awesome little ink bottles can be used for so much more than to re-fresh its stamp pad counterpart (although they are pretty great at that, too!). The ink is an acid free, water-based dye that can also be splattered using a paintbrush, misted using a spray pen, mixed with water and painted on for a watercolor look, and applied in as many other creative ways as you can come up with. Whether you’re a novice or a pro, re-inkers make color coordination easy and effortless for any crafter!
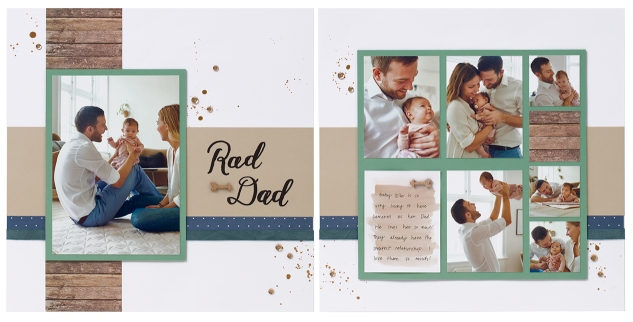
Can you spot the ways we used re-inkers in this layout? (Hint, we used them three times.)
1. There’s the Almond “watercolor” wash behind the journaling on the right page. It’s a perfect color match with the Almond cardstock used in the background, tying the journaling aspect of this layout with the visual elements quite nicely.

 To achieve this look, mix some ink from a re-inker bottle with a bit of water and then paint away!
If you’re using a paintbrush, add a few drops of ink to the inside of a stamp pad lid along with a few drops of water. Keep in mind that the more water you use, the lighter the color will end up. Pick up the ink with your brush and you’re set! (To avoid water-warped paper, use watercolor paper.) With a waterbrush, you have the option of mixing the ink and water directly in the brush, where you squeeze the diluted ink right onto the bristles.
You are going to love painting with our inks!
2. The second place we used a re-inker was to make the Toffee ink splatters on both pages of this layout.

 Again, add a little bit of water to your ink (to dilute the tone as much as you want and so that it will splatter easier than straight ink) and then, with the ink on your brush bristles, gently tap the brush a few inches above where you hope the splatter will land on the artwork.
Were you able to find where we used a re-inker the third time?
…
3. It’s a bird, it’s a plane, it’s…white ribbon dyed Crystal Blue! Dye white ribbons and twines with any of our re-inkers to get just the right color match you need for those finishing touches we all love.

 To dye your ribbon, place the cut piece inside a small bag and then add ink. Seal the bag and mix it until you are satisfied with the color. Add more ink, if necessary, either to ensure the entire ribbon gets covered or to darken the tone. When you’re ready to pull the ribbon out, use gloves to avoid getting ink all over your fingers (this can get messy fast). The ribbon will need to dry before you can use it in your artwork. For a faster drying time, use a craft heater (or even a blow dryer could work in this instance).
No matter what, you can always have a ribbon or twine to match your art!
Let’s continue the game….

This card illustrates two additional fun ways to use re-inkers in your artwork. What are they?
(We left off at 3 so let’s just continue the list, shall we?)
4. More splatters, this time with a stencil and a spray pen.

Create a white space inside your “splatter zone” with the use of a stencil. We kept things simple in our example and used a circle, but really you can do this with any shape you want—consider all of the Cricut® shapes you have at your disposal and get creative!
To use the spray pen, simply fill it with some water and add a bit of ink from a re-inker bottle, shake, and then spritz. Raise the spray pen higher for a subtler splatter and closer to the paper for a more concentrated splatter. If you want the ink to dry faster, try using rubbing alcohol instead of water.
5. How do you like the ink effect used in the stamped sentiment of this card? With very little effort, you can make your very own multi-color stamp pad.
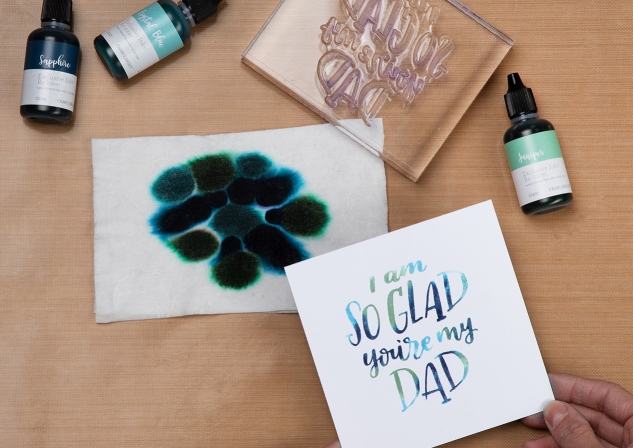
Fold a few baby wipes in half and stack them on top of each other. (We used four here, but really it depends on how much ink you are using for your project, so consider this number on a case-by-case basis.) Using your trusty re-inker bottles, add different ink colors in a random pattern to the top of your stack of wipes. Allow your ink to spread into each other and then use this “pad” to ink your stamp.
There you have it folks! Effortless color coordination for all of your crafting brought to you by your friendly neighborhood Exclusive Inks™ re-inkers! Available in every exclusive color and formulated from scratch, use these mighty ink bottles along with the ideas we shared today to make your own, one-of-a-kind, designs.
And, of course, if your stamp pad is ever getting dry….
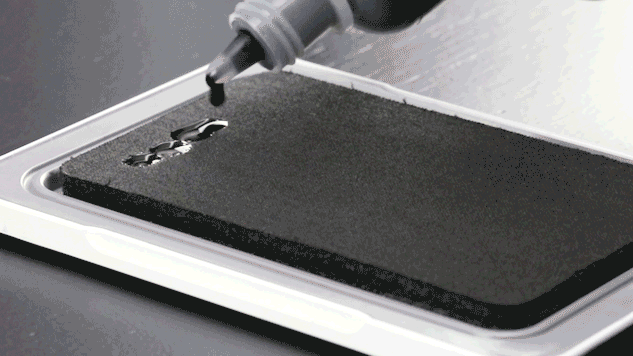
…use the coordinating re-inker to freshen it up!
Recipes:
12″ x 12″ Rad Dad Layout
Make It from Your Heart™ Vol. 3—Pattern 27 (p. 58)
D1811 My Acrylix® Rad Dad Stamp Set, X7232B Fresh Air Paper Packet, X7233B Beautiful Friendship Paper Packet, 1385 White Daisy Cardstock, X5949 Almond Cardstock, X5979 Juniper Cardstock, Z3146 Watercolor Paper, Z3271 Archival Black Exclusive Inks™ Stamp Pad, Z2727 Almond Exclusive Inks™ Re-inker, Z2217 Crystal Blue Exclusive Inks™ Re-inker, Z2728 Toffee Exclusive Inks™ Re-inker, Z4185 Fresh Air Shapes, Z4196 White Ribbon, Z4029 Bronze Sequins
4¼” x 5½” So Glad You’re My Dad Card (Vertical)D1811 My Acrylix® Rad Dad Stamp Set, X7232B Fresh Air Paper Packet, X7233B Beautiful Friendship Paper Packet, 1385 White Daisy Cardstock, X5979 Juniper Cardstock, Z2217 Crystal Blue Exclusive Inks™ Re-inker, Z2265 Juniper Exclusive Inks™ Re-inker, Z2748 Sapphire Exclusive Inks™ Re-inker, Z3325 Blue Burlap Ribbon, Z3167 Cricut® Artistry Collection
Cricut® Shape:
Artistry4″ Icon-1 <Travel> (p. 30, #M41036A)
Available in every exclusive color, these awesome little ink bottles can be used for so much more than to re-fresh its stamp pad counterpart (although they are pretty great at that, too!). The ink is an acid free, water-based dye that can also be splattered using a paintbrush, misted using a spray pen, mixed with water and painted on for a watercolor look, and applied in as many other creative ways as you can come up with. Whether you’re a novice or a pro, re-inkers make color coordination easy and effortless for any crafter!
Can you spot the ways we used re-inkers in this layout? (Hint, we used them three times.)
1. There’s the Almond “watercolor” wash behind the journaling on the right page. It’s a perfect color match with the Almond cardstock used in the background, tying the journaling aspect of this layout with the visual elements quite nicely.


If you’re using a paintbrush, add a few drops of ink to the inside of a stamp pad lid along with a few drops of water. Keep in mind that the more water you use, the lighter the color will end up. Pick up the ink with your brush and you’re set! (To avoid water-warped paper, use watercolor paper.) With a waterbrush, you have the option of mixing the ink and water directly in the brush, where you squeeze the diluted ink right onto the bristles.
You are going to love painting with our inks!
2. The second place we used a re-inker was to make the Toffee ink splatters on both pages of this layout.


Were you able to find where we used a re-inker the third time?
…
3. It’s a bird, it’s a plane, it’s…white ribbon dyed Crystal Blue! Dye white ribbons and twines with any of our re-inkers to get just the right color match you need for those finishing touches we all love.


No matter what, you can always have a ribbon or twine to match your art!
Let’s continue the game….
This card illustrates two additional fun ways to use re-inkers in your artwork. What are they?
(We left off at 3 so let’s just continue the list, shall we?)
4. More splatters, this time with a stencil and a spray pen.
Create a white space inside your “splatter zone” with the use of a stencil. We kept things simple in our example and used a circle, but really you can do this with any shape you want—consider all of the Cricut® shapes you have at your disposal and get creative!
To use the spray pen, simply fill it with some water and add a bit of ink from a re-inker bottle, shake, and then spritz. Raise the spray pen higher for a subtler splatter and closer to the paper for a more concentrated splatter. If you want the ink to dry faster, try using rubbing alcohol instead of water.
5. How do you like the ink effect used in the stamped sentiment of this card? With very little effort, you can make your very own multi-color stamp pad.
Fold a few baby wipes in half and stack them on top of each other. (We used four here, but really it depends on how much ink you are using for your project, so consider this number on a case-by-case basis.) Using your trusty re-inker bottles, add different ink colors in a random pattern to the top of your stack of wipes. Allow your ink to spread into each other and then use this “pad” to ink your stamp.
There you have it folks! Effortless color coordination for all of your crafting brought to you by your friendly neighborhood Exclusive Inks™ re-inkers! Available in every exclusive color and formulated from scratch, use these mighty ink bottles along with the ideas we shared today to make your own, one-of-a-kind, designs.
And, of course, if your stamp pad is ever getting dry….
…use the coordinating re-inker to freshen it up!
Recipes:
12″ x 12″ Rad Dad Layout
Make It from Your Heart™ Vol. 3—Pattern 27 (p. 58)
D1811 My Acrylix® Rad Dad Stamp Set, X7232B Fresh Air Paper Packet, X7233B Beautiful Friendship Paper Packet, 1385 White Daisy Cardstock, X5949 Almond Cardstock, X5979 Juniper Cardstock, Z3146 Watercolor Paper, Z3271 Archival Black Exclusive Inks™ Stamp Pad, Z2727 Almond Exclusive Inks™ Re-inker, Z2217 Crystal Blue Exclusive Inks™ Re-inker, Z2728 Toffee Exclusive Inks™ Re-inker, Z4185 Fresh Air Shapes, Z4196 White Ribbon, Z4029 Bronze Sequins
4¼” x 5½” So Glad You’re My Dad Card (Vertical)D1811 My Acrylix® Rad Dad Stamp Set, X7232B Fresh Air Paper Packet, X7233B Beautiful Friendship Paper Packet, 1385 White Daisy Cardstock, X5979 Juniper Cardstock, Z2217 Crystal Blue Exclusive Inks™ Re-inker, Z2265 Juniper Exclusive Inks™ Re-inker, Z2748 Sapphire Exclusive Inks™ Re-inker, Z3325 Blue Burlap Ribbon, Z3167 Cricut® Artistry Collection
Cricut® Shape:
Artistry4″ Icon-1 <Travel> (p. 30, #M41036A)


