Wednesday, November 6, 2024

Merry Christmas

 It's November already!

This weekend is another FETCH (weekend crop).  Each day during the weekend, my participants receive a small gift.  On Saturday, this is usually a double layout kit.  Here's a spoiler - or inspiration for anyone not attending.


 This uses the Season of Green and Gold SU paper pack.  The border stamps (with black pearl stickles in the center of the flowers), and background stamp are SU, the title is a CTMH die set, and the tree is from a die set in my stash.  It looks deceptively simple, but it allowed me to utilize many of the different printed patterns in the paper pack. I think it's difficult to see in this picture, but there is a lot of gold foil in the papers.  Christmas pictures are often very busy, with lots of different colors, and limiting the layout colors to 2 or 3 lets your pictures shine.

Tuesday, October 22, 2024

Had Fun Storming the Castle

Hello!

A change of pace today - I'm scrapping memories of visiting the London Tower.  I haven't noticed any really great papers for tours of gray brick buildings such as castles, but the reverse side of the green plane paper from the Take to the Sky paper worked pretty well this time.


I have a several elements in this one:

  • brick wall stamp - SU
  • silver embossed swirl - CTMH
  • ivy vines - SU die
  • arrow punch - CTMH
  • gray paper - SU Take to the Sky paper pack
  • red and blue stripe - CTMH (because it's London after all!)
  • and a random red glitter brad to pull over the red glitter in the title.

With the embossing - like every time I use it - there is some stray dust, but I thought it worked really well in this case and looks more distressed than out of place.


Here's my layout with the base photos.  I have flip flaps to add on top of 4 of the pictures - once this actually makes it to an album.  There were so many things I found interesting during this visit to London Tower.  It was one of my favorite stops while we were in England.

Additional uses for this layout - 

  • Bouncy house photos (you might punch up the base color and stripe to match the photos)
  • Medieval times dinner and show
  • Medieval Fairs
Just in case the title doesn't sound familiar - it's a twist of a line from movie The Princess Bride.  Max tells Westley "Have fun storming the castle!".   Anyone else love this movie?


Tuesday, October 8, 2024

Fresh Air Fun

 Happy Tuesday!

More Take to the Sky pictures for my trip to the Wright Brothers Memorial this week.


I built this layout using my pictures - so the above photo has mats over the pictures.  Sometimes it's hard to see a layout when you are distracted by the actual photos.  


This is a pretty simple layout, although I did print a lot of the photos in a 3x4 size.  You could substitute 4X6's in 3 locations.
The grouping to the right uses the stamp & die set, as well as some of the tags from the paper pack.

The title is just 4 layers of cardstock under the silver glitter paper letters. 
Another tip for making these titles in Cricut design space - create each word in its own text box.  That allows you to use different fonts and different sizes.  This one is all the same, but you can see the effect in the An Uplifting Adventure layout.

If your Fresh Air Fun day is not compatible with the airplane prints, you can flip the paper over and use the other side.  This would give you a burnt orange and blue layout - very good for hiking pictures out West or where you have red clay paths.


Tuesday, October 1, 2024

Tower of London

Hello!

I am back with another Take to the Sky layout.   The colors are a little off in this photo, but when I realized it, it was a little too late to retake it without my pictures.


I really like this layout because it holds several photos but also allows you to showcase paper that you like.

When I placed my pictures, I had a gap that needed covering.  

So I added 1/4" silver glitter strips.  And as I did so, I realized it should have been there all along.  I also used this page map for a hiking layout  (click here to see).


My title is another layered one created on Cricut design space.  Since I had a lot of silver glitter paper in the layout, I didn't use any in my title.  I used white, which is also found in my ticket, the lion on the cannon and my husband's jacket as well as the background paper.


The plane tag on the right doesn't really fit the theme, but it matches the colors perfectly.   And on the left page, I used price tags from the gift shop instead of 2x2 photos.  After all - it is a scrapbook!

 This simple layout could be used for any travel page and the colors should be fantastic for pictures taken while hiking in the woods.  Cruise pictures might work as well (navigation maps while on the open seas).


Tuesday, September 24, 2024

An Uplifting Adventure

Hello!

More pictures from the Wright Memorial.

This time I took the picture on my mats.  If you like this layout well enough to copy it, now it's easier to guess at the measurements.  I did have some inspiration for this layout - you can find it here.

I really love the colors in this kit.  The copper clay and boho blue are from the 2023-2025 additional colors. I added some stitching to the background circles.  I probably should have added a circle on the right side as well, but I liked the double mat to pull the green over.


The die plane is cut from prints instead of cardstock on this layout.


And here's another great title from the Cricut Design Space.  The plane is cut from a print paper, and the clouds are just cut from dies, using one of the tags in the paper pack.


And here's my final product.


Other possible uses for this layout:
Church retreats
Friends' night at a Roof top bar
Ski lifts - where it's just for the view
Ropes course (maybe?)

If you find another use - please share it with me.

Dawn


Tuesday, September 17, 2024

Just Plane Fun

 Hello!

I am playing with the SU papers Take to the Sky this month.   My layout holds 9 photos.  It's pretty simple, just some strips placed on white 12X12 paper.  The inside Night of Navy paper are two sheets of 8 1/2" by 11" cardstock (which is available in bulk). You cover everything thing up, so this is a great time to use some not-so-favorite paper behind all the good stuff.


I did invest in the Adventurous Sky bundle, because this makes a really neat plane!  I used Cajun Craze, Pebble (old CMTH color) and silver foil paper for the propeller.


This is also part of the Adventurous Sky bundle.  The plane and each of the clouds has a corresponding die.  I used Paprika and Blue Belle but suggest the SU colors of Copper Clay and Boho Blue.


The best touch is the title.  Ever since I started crafting titles in Cricuit Design Space, I have trouble settling for plain letters.  My tip for when you create your own - use a clean cutting mat for the top layer letters.  They are fine, with very thin sections.  I cut the orange letters for this title 4 times before I had a complete set that did not catch or tear.

And here is my final project!  Our family reunion in July included a trip to the Wright Brothers monument in Corolla, South Carolina.   


Other suggested uses for this layout and title:
National Air & Space Museum
Blue Angels Show
Airport days, when traveling for fun and with a group
Kids playing with toy planes
Adults playing with RC planes
Amelia Earhart Museum(s)
Playing with the new baby (including a picture of 'flying' the baby around the room)

Do you have any other suggestions?

Thanks for dropping in!
Dawn


Tuesday, September 10, 2024

S'More Memories

 Hello!

Anytime I get the chance, I like to roast hot dogs and marshmallows over the fire.  I don't think I've ever had a bad experience with toasted sure and an open fire.   Even though it was the middle of the day in the middle of July, I still talked my family into roasting marshmallows over the fire pit when we spent a few days in the Outer Banks.  

This paper pack is one of the carry overs, designed by CTMH, sold by SU.  Unfortunately, I cannot seem to keep pace.  This paper pack has sold out by the time I finished this layout and could get around to posting it.

The giant marshmallows and roasting stick are from an old CTMH Cricut cartridge, and I found the title on Cricut design space.  I put the roasting stick in a log design embossing folder and sponged the white marshmallows to 'toast' them.  I made the title long before I even took these pictures.  But our clothes matched the Soda Pop papers, and I just added some mats in the right colors to pull in my title.  


I have hearts on top of the faces of my nephews (just for this post).  The layout holds (6) 4x6 photos and one 3X4, but I used (2) 3x4's on some of the photo mats.  In order to get the entire story of Kiley catching her roasting stick on fire, I printed 4 smaller photos together in one of the 4x6 mats.  My final product holds 12 photos-in a layout designed for 7.

If you love the layout it should be pretty easy to recreate using papers from your stash, that match you photos.

Friday, April 12, 2024

The end of an Era and what's next

 Hello!

CTMH has decided to close their doors. My last day as a CTMH consultant will be April 30.   If you haven't already, go check out what's on sale (click here before 4/30), and see what's still there!  So much as retired, as this event has spurred a lot of stocking up on our favorites.

It is my plan to continue having a monthly crop at my house, and a weekend crop 2-3 times per year.  I still have a couple of spots available for the April 26-28, 2024 weekend crop, the crop at my house in May will be Saturday May 25, from 10am until 10pm.


Wednesday, September 27, 2023

Road Trip

 My latest kit is a double with an extra flap, perfect for any road trip adventure.  

Closed


Open

The detail work is in the Road Trip sign cut from the Cricut, You are Here cartridge, page 4, 9 1/4".   The Sundance background has been stamped using an arrow stamp set in tone on tone, (Sundance on Sundance) and the Road Trip has been stamped the same (tone on tone, sapphire) using all the stamps from the Cruising Workshop stamp set (long retired).  I have 14 photos on this layout, but there is a lot of room to play with the photo layout.  The 6"x12" flap is included in the kit.

Tuesday, July 18, 2023

Solid! as a Petrified Rock

 Happy Tuesday!

These layouts are using the Dream Maker paper pack - and once again - my posts come after the paper pack has sold out.  But if you just couldn't resist all the pretty colors and ordered it before it became unavailable (or you have something in your stash you can substitute) I hope these can inspire you.


I had trouble deciding on a title for the Petrified Forest but ended up pretty pleased with this one.  The layout itself is pretty simple, with the background pieces being 5 3/4" x 10 3/4" with a 6" x 11" mat.


After my photos were stuck down, I found the trail guide.  I pulled up the mat on the left page, powdered the tape, then added more tape just along the bottom and left side to make a pocket to hold the folio.  Hopefully, you can make the pocket before you stick it all down!


This layout holds the rest of my Petrified Forest photos.  I like the overlapping of the photos in this one.  The stamp set is from the Change of Scenery kit (again, gone before you could blink, or at least before I could design anything using the papers!).  For the trees, I cut a bunch of different designs and sizes (ranging from 3/4" to 2 1/2") using the Cricut and my older CTMH cartridges.  I stamped one of the colorful swirled pages with the background stamp before cutting the trees.  I like that distressed look of print on color. I also sprinkled in some cardstock trees that match my matting.  

PS Cinnamon (retired) was a great color for matching the Petrified Forest and the Grand Canyon, but Desert Rose and Paprika aren't too shabby either.

Tuesday, July 11, 2023

Metal Monument

Hello!

This layout uses the quickly unavailable Hey Handsome papers, but if you like the layout, hopefully there is something in your stash you can substitute for it.  It's just some strips - 3", 1 1/2, " 1/2" and 1/4" with a strip of ribbon at the bottom.  I switched up my strips on the two pages on purpose, but for all you engineer minded scrappers, you can make both sides the same.  Before placing any strips, I drew a pencil mark 3 1/2" from the top and bottom, then using stamps, I added the paint details.  


Make sure to throw in some tiny print detail after you add the ink blots to add even more distressed detail.  Pick an old stamp that makes your heart happy.  Mine is just some fine lines from a very old Father's day stamp set. 


Tuesday, June 13, 2023

Float

 Here's another layout using the Hey Handsome papers. I used some old stamps to decorate the white base pages.  I didn't know if I would like the title in a printed paper or in cardstock, so I cut out both - then ended up layering them.

And if you haven't ever tried a hot air balloon ride - I totally recommend it!


Tuesday, June 6, 2023

Baseball

 This kit uses the Hello Darlin papers.  And some now retired Carolina Blue that I had in my stash.  This kit is now available.  And who doesn't have some Trash Panda photos they need to scrap?


Tuesday, May 30, 2023

Explore

 I am really loving the Hey Handsome papers for my travel pages.  The oranges go so well with my Antelope Canyon photos!


Tuesday, April 18, 2023

Soup-er Gnome

 After I tried and tested a recipe, and know I'm going to be making it on a regular basis, I like to make a 6X6 recipe card.  The Kitchen Gnomes work great for this.


Tuesday, April 11, 2023

Hey Handsome Card Workshop

This card workshop is now available!  If you love it, you can buy the kit from CTMH for $39 and make 4 of each card and keep the stamp set and dies.  Or you can attend a workshop and make 1 set of 4 cards for $5.


Tuesday, April 4, 2023

Tracking Mud - Hiking pages

 These hiking pages use the As You Grow paper suite from the September 2021-August 2022 catalog.  The paper kit was designed with growing babies in mind, but I was attracted to the mushrooms and ferns.  It also used the Are We There Yet set as a border stamp.


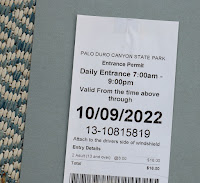
I wanted to keep the receipt for the park, but not include it as part of the layout.  I taped it to the back.  It can be interesting to look back at what things used to cost.

I also wanted to include the large map we picked up while visiting the park.  I added a matching tab to the top of the map and slid it in between the two layouts.  The tab peeks out enough you can pull it out for easy viewing.


Wednesday, March 29, 2023

National Scrapbooking Day

 CTMH is offering 5 exclusive kits for National Scrapbooking Day.  They will be holding Face Book events on May 5-6 if you would like to craft with the CTMH corporate team.   The kits are available through May 31 or while supplies last.  Kits include a stamp set.  Paper packs are not available separately.  Check it out!


Tuesday, March 28, 2023

Easter cards

Easter and Halloween tend to have some really cute stamps.  They are not holidays you would typically send cards for, but some years, I just have fun making them and sending them out to my niece and nephews.


Markers for the chick - true blue blend, antique pink blend and yellow gold blend.


I still like using up the last of the kit by making this type of card base.  It works well for the gnome, or for any type character.


Tuesday, March 21, 2023

Birthday Gnome Card Workshop


Hello!

I still like the gnomes!  This birthday gnome workshop is now available.  You can make 3 cards for $5 on any workshop day.  If you are outside of my workshop range, I've listed the marker colors I used.  Sometimes deciding which colors is the hardest part.  

For the papers, I pulled from my old stash of CTMH birthday suites.  I like that I managed to use cute gnomes but created masculine cards.

#CTMH party gnomes

blower gnome

cake gnome

balloon gnome


Tuesday, January 31, 2023

School Days Layout with Storybook

Good morning!

This kit is available at any workshop day.  I am including detailed instructions on this post, in case you would like to recreate the page from your own stash.  At the bottom of blog, there is a list of needed supplies.


Steps:

Trim your base cardstock (2) so you are left with a 1" frame.  I have used Mist in my example.

Trim your white cardstock 1/2" on one side, rotate 90 degrees and trim 1/4".  Your end product will be 2 sheets of 11 1/2" x 11 3/4". 

Place the white sheets on the cut base sheets.  The white paper is flush in the center, leaving an even border around the edges.  Using a corner rounder, clip the far corners on the left page and the far corners on the right page, but leave the center corners square.

Cut (4) 1/4" x 11 3/4" strips from a stripe pattern.

Cut an 11" circle.  I used the Cricut.  You can trick the machine into cutting an 11" circle by telling it you have inserted a 24" mat.  Cut the circle by placing the edge on the 8" mark of your trimmer. 

Cut the center pieces of your base pages to 6 3/8" tall.  Trim one of the remaining scraps to 3 1/4" x 8 1/2". From the other leftover piece, stamp the bib-li-o-phile stamp several times in Versamark, and clear emboss.  Using an alphabet die set, cut out some letters.  Wrap several with string.

From a 3rd piece of matching cardstock, cut a 6" x 8 1/2" mat.

Draw a light pencil line 3" from the top on each of the white pages.  Stamp the row of books (I used Sage) starting at the right side on both papers.  Stamp 3 times on the left page and 4 times on the right page.

Stamp the open book, the stack of books and the certified tab on white card stock in the same-colored ink (Sage in the example). Then stamp on top of the image with Versamark and clear emboss.  

On a 4"x6" piece of white card stock, cut using the notebook die on each long edge.  Slide the die from edge to edge, do not turn it around.   (Just try to cut it straighter than I did in the video.)


Adhere everything down, sprinkle in a few wooden letters, and add a few dots with liquid pearl (black in the example).  You could also use old alphabet stickers to make your ABC clusters, if that works better for you.  There is sufficient space on the left page, top or bottom, to stamp an appropriate title - just use different font to keep with the mix and match ABC theme!

Supply list:

  • 3 sheets Mist cardstock
  • 2 1/2 sheets white cardstock
  • 1 sheet printed paper (I used papers from Storybook)
  • 1"x12"striped paper (cut into 1/4"strips - or you can use glitter trim here)
  • String, yarn or twine
  • Versamark
  • Clear embossing powder
  • heat embosser
  • Sage ink
  • In a Book stamp set and dies
  • True to Life stamp set (retired)
  • Black liquid pearl
  • Notebook edge die (retired)
  • Adhesives & blocks


Tuesday, January 24, 2023

Something new...

 If you haven't already subscribed, the Close to My Heart Blog Site has great tips and information about the latest products.  Like the Valentine's special paper pack Now & Forever.


Or - if you are a bunny fan, it's the year of the Rabbit, complete with a super cute bunny stamp by CTMH.   Also available in 2023 is the 2022 year of the Tiger stamp.

Thanks for hopping by!