Wednesday, November 28, 2018

Baby Animal Doodles - Penguin

I've been playing with the Baby Animal Doodles again and this is what I've come up with using the penguin.  All patterned papers are from my scrap pile.
I printed these words on the computer.  The red stripes are washi tape and I wrapped some of our silver thread around them.  The black penguin was embossed and I used the Art Philosophy cartridge to cut his white belly, 1/4" oval.
I used a snowflake die for the giant snowflake, words are printed from the computer and the snowflake paper is from 'Tis the Season. 
 
I saw something similar to this on Pinterest.  The sentiment is from a retired Christmas set.  These penguins were embossed with our new silver embossing powder and have silver glitter paper bellies.
 
The words were printed on the computer, and the paper is from 'Tis the Season.  Probably a better title for a snowman page, but there is a little snow on the background in the window.
 
I used the Watercolor Impressions stamp set in Pear and Lagoon for these colors with the little spots and words in Outdoor denim.  The sentiment is from an older CTMH penguin set and stamped before I used the texture paste.  I used our stencil papers to make a "ice cube" background from the Artbooking cartridge, then covered the watercolors with clear transparent texture paste before adding the penguins.  

Sunday, November 25, 2018

Inner Elf - Scraplift


I would like to thank fellow CTMH consultant Andrea Sherman for her permission to scrap lift this layout for my own workshops.  I came across it on her blog (click her name to see her version) and wanted to recreate it!  Such a super CUTE page for your little elves, your mischievous Christmas side or some Elf on the Shelf antics!


You can recreate this yourself with a few simple items:
'Tis the Season paper pack
Candy Apple cardstock
New England Ivy cardstock
Gold glitter paper
Season of Joy Cricut cartridge
Or you can purchase a kit from me for $10. 
My sample above uses the snowflake pages from the 'Tis the season pack, but the kits will include two cardstock sheets with stamped snowflakes.


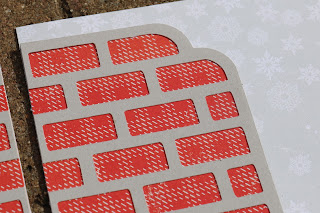
The red 'brick' paper is cut to the right size, but once you glue the gray brick overlay to the red brick paper, you will need to trim the four corners to match. Do all this, and then cut the 'chimney' where you want to divide it for the two pages.

Match up the elf feet anyway your like and pop the shoes on the legs with foam tape.


The kits include a sheet of Candy Apple or New England Ivy card stock (your choice) for matting your photos.

Wednesday, November 21, 2018

Doodle Bugs

One of the cutest sets Close to My Heart is offering right now is the Baby Animal Doodles.  It comes with a matching set of dies.
Here are some cards I did using the lady bug from the set, to help break out of the mold that these doodles are just for baby cards/pages. All the papers are from my scrap pile, except for some white card stock.
For this card I cut the wreath from the Flower Market cartridge in the size that fit my scrap, which was 5".  The watercolor is from the Watercolor Impressions stamp set, in fern, both first and second generation.  The words are from two different retired stamp sets and luck was from an alphabet set.
I printed the sentiment on my computer, using the Harrison font. To get the words in the right place, I cut Daisy cardstock to 8.5"X11", then placed the words where I could cut out the white block I needed for the cards.  I used our Carmine Shin-Han marker to color them in.
 
The sentiment is computer printed again.  I used an old clear bag to make the clear layer for the shaker, and thick foam tape to make the sequin well.  The hearts are cut using our stitched heart dies.
 
This one uses the May 2018 stamp of the month, and the Watercolor Impressions stamp set.
 
This one uses the Watercolor Impressions stamp set for the clouds and the Decorative borders dies for the green hills.
 
Computer printed words, bugs colored with the Shin-Han markers
 
Watercolor Impressions stamp set, and a scrap leaf from my leftover cut pieces box. The color I used here was Carolina, but managed to get a little fern green on the edges because I didn't clean my stamp after using it to make the Christmas luck card. I really like the effect, but haven't tried to duplicate it on purpose!
 
The X is from an alphabet stamp set, the words were printed on the computer.  The ribbon is just taped down on the backside. This layout is from the Make it from your Heart Volume 4.

Tuesday, November 20, 2018

2018 Week 33

This layout is one of the 3 included in the instructions with the Grateful Heart scrapbooking kit.  I modified picture layout a little from the original, but it's pretty close.

Monday, November 19, 2018

2018 Week 32

This is another college layout using a lot of retired stuff.  I managed to use up the last of this kit while I was at it!

Friday, November 16, 2018

2018 Week 31

These papers are from one of the Cut Above Create from the Heart subscription sets.

Click here to see the suggested version.

 
The Boutique papers are great for the Venetian décor.

Wednesday, November 14, 2018

2018 Q4 Frame It

This is the layout for the next Frame It workshop on November 8, 10AM.  Cost is $10 or $25 with frame.

Supplies used:
Tis the Season Paper pack
Cardstock - candy apple and New England Ivy
Rustic Home (retired) for the deer.
Gold glitter paper
Red Pearls
Gold flecked Gems
Artistry Cartridge
Season of Joy Cartridge
Rustic Home ribbon (retired)
foam tape
adhesive
snowflake die set (retired)

Here are a few tips if you are looking to recreate this at home.
*Cut the 1/2" off the bottom, leaving the zip strip on the top of the garland paper.
*Cut the tree from the Artistry cartridge, page 48, 9".  Cut the tree out of the garland paper from the Tis the Season paper pack, but position the cutter 2.5" down and 1/2" in from the left.  Make sure you position the paper so the tree cuts in the right direction.
*Use a 6X12 piece of the fern words paper for the back of the tree and pop the two levels using foam tape (the middle of the shaker card foam worked great here).
*The ribbon is retired from the rustic set and just curls like that straight off the spool.
*The gold star is a square, which I penciled a line needed to make the tip of the tree and hand trimmed the one point.
*The giant snowflake is gold glitter paper and from the retired snowflake die set. You can always find a good snowflake on the cricut and cut it about 3".
*The Jingle all the way is from  New England Ivy and Candy Apple cardstock, using the Season of Joy Collection, cut at 3".  The deer is part of the cut, but I recut that piece using the retired rustic home paper pack.
*The poinsettia is fussy cut from a PML card from the paper pack.

Monday, November 12, 2018

2018 Week 30

So I tried to practice what I preach this year - that spending a little time each week completing one double layout will get you 50 completed DLO's for the year and let you scrap all year long.

Blew it big time.

But sometimes reality isn't the same as theory. So my "little bit every week" theory is extremely flawed for anyone with an active life.  But I'm still going to work on getting 50 DLO's posted here for inspiration by the end of the year!  And I'm labeling them by week, even though I have played catchup - either in scrapping or in posting - this year.

This page uses a retired CTMH Thanksgiving set - the one with swans, and the Art Deco Cricut Cartridge.  I mean, how often do you get to put flappers on your scrap pages?

Sunday, November 4, 2018

November Card Workshop

The November card workshop will be the final one for 2018.  Cost is $5, Thursday November 8, 5:30-7:30PM. 
We will be making some red and green STUFF!  Not just cards this time but one card

one treat topper

one shaker gift tag

and one 3X3 folded gift tag.

There are 10 slots available!  And if the treat topper is not something you will use, I can show you how to turn it into 2 cards with just a little of your own supplies.